There's really no way to predict what nature's going to throw at us. I've seen snow in June and 70 degrees in February. The couple feet of snow we've received in the last month has put a serious damper on garden progress, but we're still grinding along. In the face of such a powerful force, all we can do is adapt, and that's what we'll do.
Any real progress towards planting came to a screeching halt a couple days after my last entry. We got about a foot of snow overnight. The next week, another blizzard. A third dumping of snow shortly after that left us with just as much snow as we had in February before it all melted. Hopes of an April planting have disappeared, and as the snow slowly melts, it's looking more and more like it'll be the 2nd week of May before we get anything in the ground.
But, regardless of the snow, the days are getting longer and that's got the layer chickens laying eggs at breakneck speed. Over the last two weeks, our six hens have averaged just over 5 eggs per day. This is great news to a teenage boy who recently learned how to cook eggs and has decided to eat them for nearly every meal. We've finally reached the volume of production we hoped from those six girls, we have all the eggs we will ever need with enough to give a few away to family. That's a welcome state of affairs after a winter filled with very sparse egg production.
A question that has come up around the house several times lately is the question of washing eggs. Ideally, we wouldn't have to wash eggs. Sometimes they are just laying there nice and clean and go right into the carton. Other times, they will have some volume of mud or chicken poop on the shell. This is especially an issue recently, as one of our hens has decided to build herself a nest right at the bottom of the ramp leading to the roost in the coop. She lays an egg there, and then every other hen follows suit and lays their eggs in the same spot. Then each hen walks over the top of the nest on their way up to the roost. We've got a nest box in the coop, at this point I think my only option is going to be to put something there so she can't make a nest there, hopefully forcing her to use the nest box. But, back to the point, this leaves some dirty eggs. About 45 seconds of searching the internet brings up two methods for cleaning eggs. The industrial method of rinsing them in a very diluted bleach mixture, or simply rinsing them in warm water.
Now, I know that there are people who do not wash their eggs. It's possible to just scratch or rub off any soiling and then put them in the fridge. I don't want to do that primarily because I have two young children in the house, and I don't want them exposed at all to anything in that chicken coop until they're older and their immune systems are better developed. The reason people don't wash eggs is because there is a coating on the eggs that keeps anything on the outside from getting inside. As soon as the egg gets wet, that coating is washed off. The problem with washing eggs occurs because under certain circumstances, a vacuum can be created inside the egg, and without that protective layer, bacteria on the outside of the semi-porous egg shell can be drawn inside the egg. This situation can be prevented by washing the eggs in water at least 20 degrees warmer than the inside of the egg. You can imagine that the bleach/water solution also solves that problem by making sure that there is no bacteria on the outside of the egg to be drawn in. However, the idea of putting bleach on my food is rather distasteful, so I discarded that idea almost immediately.
The method we use to wash eggs is to bring all the eggs into the house after collecting. We have a special egg carton for dirty eggs, and any eggs that need washing go in that carton and go in our second refrigerator. This fridge is used for non-food things, like storing fishing bait, so there's no sanitation issues here. After several hours we know the eggs are cooled to about 40 degrees, we take them out and rinse them quickly in water slightly warmer than room temperature. We then scrub off any soiling with our hands, and give them one more quick rinse to make sure they're clean. At this point, they're wiped off with a clean paper towel and placed into a clean egg carton. No chemicals and no wondering if they're safe to eat.
You may have a preference for a different method, or even one of the commercial egg cleaning solutions on the market. I haven't tried other methods so I can't say that my method is the best, only that it works well for our family. I would be very interested in any other methods that readers would like to share.
Monday, April 22, 2013
Thursday, April 11, 2013
My new hobby.
The subject of gardening was never really high on my radar growing up.
First of all, I didn't much care for veggies and the ones I did like,
well those could be purchased at the grocery store. My husband on the
other hand has always had an interest in gardening and when I was
pregnant with our first child three years ago, he finally drug me over
to the green side. I have to say at first, I didn't like it. Dirt,
worms, bugs, weeding - it was kind of torture for me to be out there
with him. That all changed when things started to grow and I was
actually getting to eat some of the things we had planted. It was
awesome getting to wander into the backyard and get my salad. (By the
way, I still don't own a salad spinner.. I use a pillowcase and it works
great). We put so much work into gardening that first year and we had a
freezer full of veggies all fall and winter to show for it, I was
hooked.
When my daughter was about 7 months I started feeding her some of our garden veggies and to my surprise, she loved everything. This made gardening even more appealing to me, knowing that I could produce pretty much all of my baby food for a fraction of the cost of buying it in the store. She is now almost three and I am proud to say she loves pretty much any vegetable you give her, I do attribute much of that to our garden. Our second child will start her solids right around the time our first seeds start to sprout this year, hope she likes her veggies as much as her sister does.
When I had my children I started to become really aware of where our food came from and what exactly it took to produce it. I had no idea what a typical egg laying chickens life was like, how long those said eggs sat on a shelf before someone purchased them or even what a GMO crop was. The more I learned about where our food came from and how it was produced, the more appealing gardening and raising chickens sounded to me. I have learned so much in the past couple of years and it really feels like every day I learn more. I hope to share some of my learning experiences on this blog, and learn a from others as well.
Wednesday, April 10, 2013
To till, or not to till. That is, uh, one question anyway...
I have always tilled my gardens thoroughly. I've always had access to equipment to do this, so it's never really been a question before. This year, though, because I'm switching the garden over to almost entirely raised beds, I ran into a little dilemma. There's no way I can get a garden tractor and tiller into the raised beds without destroying the frame and compacting the soil until it resembles concrete. I have a smaller front tine tiller too, but it needs carburetor work and I just don't feel like doing that while there's still snow on the ground.
So instead, I decided I was just going to no-till. Except that I had planned to till, so the garden is full of holes from digging last fall, and generally not in any condition to seed directly. Now, there are huge benefits to no till gardening. The extensive network of fungi and populations of beneficial bacteria in the soil remain undisturbed in no-till gardening. To make a fairly long story short, this leads to healthier soil and better growth and production. Except for me, it's just not realistic this year.
Ok, I said, well if I can't till and I can't no-till, I'll just build the beds, add amendments and rake it together. I figured it'd be clumpy and uneven, but manageable. I picked up a new hand cultivator and steel rake, and prepared for backbreaking work busting clumps and digging out old roots and grass clumps that grew late last fall.
Boy was I ever surprised. This is a little embarrassing to say, but I've been tilling and using other gas powered equipment to cultivate for so long, that I haven't ever really tried doing it by hand. I pulled out the grass and root clumps using the hand cultivator, gave it a little scratch on the top inch or so of soil to level it off, and raked it smooth. I did a 100 sq. foot bed in less than 10 minutes. Then I scattered finished compost over the bed, and raked that into the top inch of soil very gently. In 15 minutes, I was done with the first bed. I plan on having seven beds like that this year. Even if the other beds take just as long, that's less than two hours of work to prepare 700 square feet of garden bed. That's less time than it takes to put the tiller on the tractor, check the oil, fill it with gas, lube the tiller chain, and check the hydro fluid, not to mention actually tilling.
The other huge surprise was that the soil is nearly perfect. Without the 400 pound tractor driving on it, there's no compaction. I'm starting to think that most of the work the tiller does is to break up the clumps caused by driving the tractor on the garden. And, I didn't spend a penny on gas to do it.
To till? No thanks. Maybe never again. To no-till? Maybe, but it'll have to wait till next year. For now, I'm somewhere in between, just enjoying my discovery that doing something the hard way isn't always the hard way.
Monday, April 8, 2013
The ideal of sustainable mini-farming
I'll be the first to admit, my goals are probably unrealistic. The odds of going from hobby garden to self-sustaining mini-farm in three years are pretty low. But, that doesn't mean we can't try.
So, for us, what does self-sustaining mean?
Well, defining that isn't so easy either. Last year, we had a hobby garden and some chickens. This year, we're working towards self sufficiency with the hope that next year our mini-farm will produce most if not all of our staple foods and enough income to pay for itself. Maybe we should lay out some specific goals for this year.
1. Provide 50% of our staple foods for the following year. This means that we need to grow, harvest, and store enough vegetables that the majority of the vegetables we eat for one year, starting this summer, come from our gardens. This also means that we have to raise, catch, or hunt for enough meat that less than half comes from other outside sources. This is going to be a huge challenge, not only because of the sheer volume of food needed to feed a family of five, but also because it's going to be nearly impossible to quantify this in any way. So we're going to guess. It's really the best we can do on that one. There are also some exceptions to this. We're not going to make ourselves go without things that we can't grow. We want to know that we CAN provide everything we NEED. Not that we will provide everything we want. We love rice, but we can't grow it, reasonably. So, we'll buy rice. This will be factored into the 50% of things that we don't provide for ourselves.
2. Don't put more money into it than we get out of it. This goal is pretty straight forward, once clarified. We are not going to spend more money on the farm than we save or make from it. In the case of chickens, this means that we can't spend more money raising butcher chickens than it would cost for us to buy quality organic chicken. The same goes for garden produce. This means that we have to be creative with feeding chickens, because commercial feed is expensive. In order to guarantee success on this front, we will be selling produce at the farmer's market.
3. Provide higher quality produce than is otherwise available. If what we're growing or raising isn't better than what we could buy at the grocery store, that's not success. I don't mean better tasting, I mean fresher, more nutritious, safer, healthier, etc. It'll probably taste better too, in most cases, but not always. I'm sure my bread won't taste as good as what's available at the store, but it'll be better for my family.
4. Everything must be organic/natural. Alright, personally, I'm not a fan of the organic label. I don't think it's a guarantee of anything. But for purposes of explanation, I'm going to use it with one exception, my goals for organic are going to be even more strict. By this, I mean we will use no chemicals of any kind on our property. Not even commercial "plant derived" chemicals. No more spraying dandelions, if we get potato bugs we'll have to find a non-herbicide solution. If our tomatoes get ravaged by caterpillars we'll be out there with red pepper spray and gloves to pick them off the plants. Anything we put on our plants or soil is going to be something we mix or make, so we know exactly what's in it. This is going to be quite time consuming, but it is essential to accomplish goal #3.
5. In order to cover all other bases, we will adopt as a standard practice will be guided by the definition of organic agriculture given by the International Federation of Organic Agriculture Movements. This is as follows:
"Organic agriculture is a production system that sustains the health of soils, ecosystems and people. It relies on ecological processes, biodiversity and cycles adapted to local conditions, rather than the use of inputs with adverse effects. Organic agriculture combines tradition, innovation and science to benefit the shared environment and promote fair relationships and a good quality of life for all involved..."
Accomplishing these goals will be challenging, and we'll have to find unique ways to meet them. I'm sure we'll fail on some parts of this, this year. Probably next year, as well. It's probably not realistic to set the goal of being self-sufficient by the end of year three. However, without a goal, there is nothing to strive for. If we just say "someday", well someday may never come. I would rather fail to achieve a goal, than have no goal at all.
The Chicken Tractor
This weekend's main project, aside from a continuation of spring cleaning, was to build a chicken tractor. The butcher chickens are getting too big for the brooder, and it's time to clean the winter bedding out of the layer chickens' coop, so I needed a place to put birds.
Chicken tractors can be whatever you want them to be, but in essence, it's a chicken coop or cage without a floor, that can be moved to a different location. I have seen some very fancy designs ranging from very small for two or three chickens, to quite large, requiring a tractor to move them. Many of the designs I've found are too small for our purposes. Currently we have six laying hens, but that could double pretty quickly if we decide we want more. I also need it to be large enough to hold a dozen or more butcher chickens if needed. Also, I don't want the birds to be packed so tightly that they dig down to bare dirt too quickly. For our purposes, we wanted something fairly large, but light enough that my 14 year old son could move it. Now, there are many many websites that have designs and pictures of chicken tractors, so I'm not going to go into that part too much. Suffice to say that if you look at enough different pictures, you'll figure out what you want in a chicken tractor pretty quickly.
We had some 8 foot 2x4s left over from a project last fall, so we decided to use them. Our chicken tractor is nothing but an 8 foot by 8 foot, 4 foot tall cage, wrapped in chicken wire, with a partial roof for shade and a nest box and small shelf for the chickens to roost on at night. Currently, it's incomplete, as I still have to put plywood on the back side both to block wind and to provide additional shelter from hot summer sun. Currently we're staring a spring blizzard in the face, so completion of this project and actually using the tractor will have to wait until that passes.
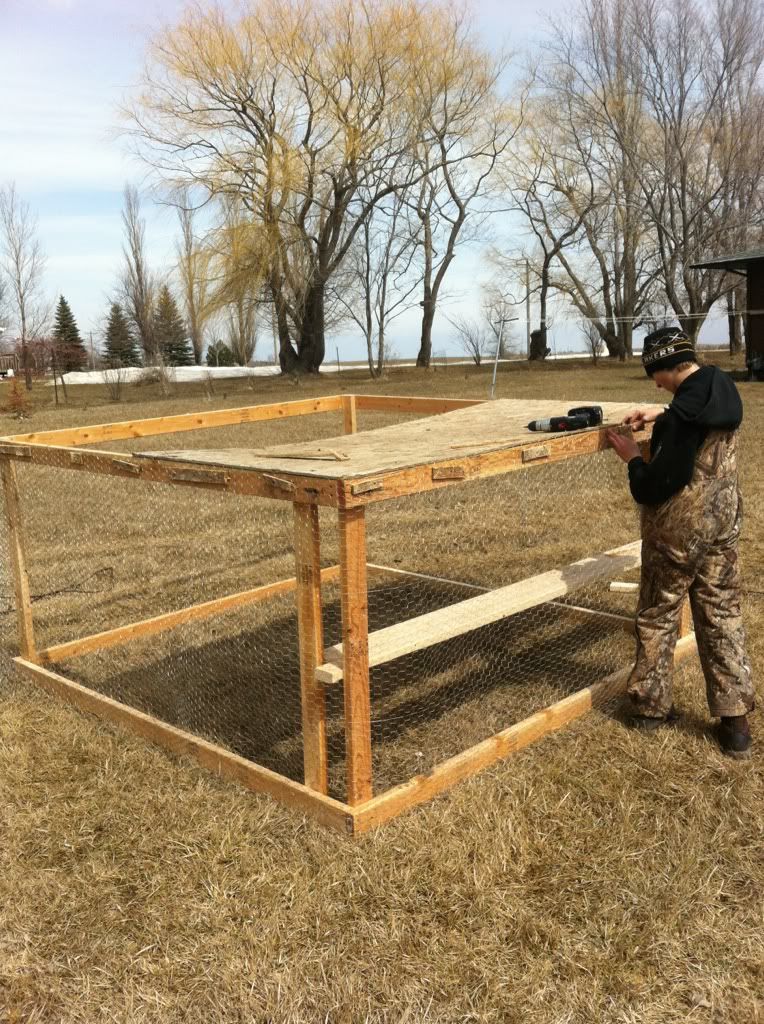
My son attaching chicken wire to the partially completed chicken tractor. Still to be added in this picture, plywood on the side he's standing on to block wind and sun, a rope attached to the bottom frame to pull it, and a nest box. After that, we'll just put the feeder and waterer in the tractor and move it to a new spot every day or so.
More examples of chicken tractors:
http://www.backyardchickens.com/a/chicken-tractors-mobile-chicken-coop-designs
Chicken tractors can be whatever you want them to be, but in essence, it's a chicken coop or cage without a floor, that can be moved to a different location. I have seen some very fancy designs ranging from very small for two or three chickens, to quite large, requiring a tractor to move them. Many of the designs I've found are too small for our purposes. Currently we have six laying hens, but that could double pretty quickly if we decide we want more. I also need it to be large enough to hold a dozen or more butcher chickens if needed. Also, I don't want the birds to be packed so tightly that they dig down to bare dirt too quickly. For our purposes, we wanted something fairly large, but light enough that my 14 year old son could move it. Now, there are many many websites that have designs and pictures of chicken tractors, so I'm not going to go into that part too much. Suffice to say that if you look at enough different pictures, you'll figure out what you want in a chicken tractor pretty quickly.
We had some 8 foot 2x4s left over from a project last fall, so we decided to use them. Our chicken tractor is nothing but an 8 foot by 8 foot, 4 foot tall cage, wrapped in chicken wire, with a partial roof for shade and a nest box and small shelf for the chickens to roost on at night. Currently, it's incomplete, as I still have to put plywood on the back side both to block wind and to provide additional shelter from hot summer sun. Currently we're staring a spring blizzard in the face, so completion of this project and actually using the tractor will have to wait until that passes.
My son attaching chicken wire to the partially completed chicken tractor. Still to be added in this picture, plywood on the side he's standing on to block wind and sun, a rope attached to the bottom frame to pull it, and a nest box. After that, we'll just put the feeder and waterer in the tractor and move it to a new spot every day or so.
More examples of chicken tractors:
http://www.backyardchickens.com/a/chicken-tractors-mobile-chicken-coop-designs
Thursday, April 4, 2013
Dig up some dirt and throw down some seed
Starting seed indoors is a great way to give your plants a head start on the growing season. Plants that are typically purchased from a nursery and planted directly, like tomatoes, peppers, and cabbage can be started indoors to save some money. Other plants can be started as well, although some plants like carrots are best seeded directly just due to the number of plants.
This year, we started several varieties of tomatoes, peppers, cabbage, broccoli, eggplant, and some other obvious choices. We also went out on a limb and decided to start some of our onions in containers, so they can be transplanted as young plants into the garden, instead of planting sets or sowing directly.
With many varieties of onions needing 85-90 days to maturity, and our sometimes short growing season here in northern South Dakota, starting from seed can give us a little insurance against a surprise shortened growing season. Also, onions grown from seed get larger and grow better than onions started from sets, so it made sense all the way around.
I decided to use an old plastic container that was about 2 inches deep, and filled it with a mixture of seed starting mix, and some soil from our garden. Because onion seedlings require very little space, I was able to fit quite a few seeds into the container, and in retrospect I could have planted even more. Seeds were scattered on top of the soil, with a very light covering of soil to cover them. 1/16 inch or less is just fine. The first few times I watered, I misted the soil with a spray bottle, as potting soil mixture has a tendency to float up and move around easily when water is poured onto it. Even though I used a spray bottle, I still watered quite thoroughly. This disturbs the germinating seeds less. Because onions seeds are sown directly on the surface or just barely covered, they need to be watered frequently so the top layer of soil doesn't dry out, as this will kill the germinating plant.
Our onions emerged about 5 days after sowing, and were placed under a grow light at that point. Eight days after sowing, we have several containers that look like this!
Snirt and soaker hoses
Yes, snirt. That stuff that happens as spring comes, it's half snow and half dirt. The ground is frozen, anything that's not frozen is soupy mud, and we're still at least a couple weeks away from even the earliest plantings. As far as I'm concerned, the name of the season between winter and spring is Snirt. But, there's still lots of other work that can be done, and a good excuse to get out in the warm afternoon sun is never a bad thing.
And so what's on my mind today is hoses! Now is the perfect time to check hoses for leaks, bad fittings, etc. Because of the location of my garden and fruit trees, I have a lot of hose. About 275 feet, actually. This all needs to be unrolled, hooked up, and checked for leaks or cracks. Also, I need to test sprinklers and watering wands, etc. Now is the time to buy any new hoses or fittings, instead of waiting until the last minute and discovering that you're 20 feet of hose short. Also, I'll be picking up a few soaker hoses to use this year, instead of overhead watering. I expect that this will save some water, as well as reduce the risk of fungus or other similar disease on plants.
So to understand exactly how his will work, there needs to be a brief description of the garden layout. I have always planted in an open garden, no boxes or containers. This is the traditional way of growing things, and the most common. It's also very inefficient. I'll go into this more in another post, but for now, the important detail is that this year, our garden will consist almost entirely of four inch high raised beds 24 feet long and four feet wide.
To water those beds, and not the walkways between them, I'm switching them over to soaker hoses that I'll place in each bed immediately after planting, and then leave there all summer. Advantages to this method are that I won't be spraying water into the wind, so it all goes on the ground, and that I'll be able to measure, quite accurately, how much water goes on each bed. To do this, I hook up the entire system of hoses and soaker hose. Roll the soaker hose up and put it in a 5 gallon bucket. Turn the water on and time how long it takes to fill the bucket. I now can calculate the flow rate of the soaker hose in gallons per minute. This flow rate is dependent on quite a few things, such as what the water pressure is at the faucet, how long the hose is running to the soaker hose, and how many soaker hoses I'm running off the same supply. If I want to run two or more soaker hoses at the same time, I put each one in a bucket and time it.
Since my goal with watering is to water less often but water deeper, to encourage deep root growth, I'm going to start with a goal of watering one inch per week, assuming that it doesn't rain at all that week, as I have fairly heavy soil that retains water well. I almost certainly will have to adjust this during the heat of the summer, but I need a starting point. Since my garden beds are 96 sq feet, I'll round that up to 100 sq feet per bed. So, once a week, I need enough water to fill an area 100 sq feet and 1 inch deep. If that were 1 sq foot, 1 inch deep, that would be 1/12 of a cubic foot. For ease of conversion, there are 1728 cubic inches in one cubic foot, and there are 231 cubic inches in a gallon of water. So, divide 1728 by 231 and we get 7.48 gallons in 1 cubic foot of water. Now, we only want 1/12 of that, so divide by 12 to get .62 gallons per square foot of garden, gives us 1 inch of water. Multiply by 100 because my beds are 100 sq feet, and that means I need to put about 62 gallons of water on each bed each week, as a starting point, assuming no rain.
So, once I know how long it takes the soaker hose to fill a 5 gallon bucket, the rest is easy math. To estimate, one brand of soaker hose I've looked at flows approximately 54 gallons of water per hour per 100 feet of hose. Since I'll be using about 50 feet of soaker hose in my 24 foot long beds, that becomes 27 gallons per hour. I need 62 gallons to water a bed, so that means I need to leave the soaker hose on for about 2 hours and 15 minutes. Of course the reality of my setup will be different, and the only way to know is to buy the hoses and test them in a bucket, and calculate from there.
Why do all this? It certainly isn't necessary, I've grown vegetables for years using sprinklers and watering cans. Well, not all vegetables need the same amount of water. By knowing how much water comes out of the soaker hose per hour, I have a baseline that I can adjust from for each bed, based on what's growing in it, the weather, how much rain we've had, and what type of soil I have in each bed. Even going further than this, I can now document this in a journal, so I can track results from year to year, and experiment against that to try to get better production from the garden. Another reason is so that I can water at night, using a hose timer. Less water is lost to evaporation when watering is done at night. Knowing how long the water needs to run on a bed, I just set the timer, turn on the water, and head in for the night. No more checking on the sprinkler every 20 minutes to make sure the wind hasn't changed and isn't leaving an area dry, or that the sprinkler hasn't stuck. Sure I could set a timer on soaker hoses without knowing how much water comes out of them, but I'd rather not guess, when I can know exactly how much water I'm putting down with just a little bit more work in the spring.
Wednesday, April 3, 2013
Anxious and Worrying
This is going to be a lot of work. Ok lots of things are a lot of work. Not all of them are worth doing, either. This is worth doing, it really is. Right?
Making a fundamental shift in your lifestyle is always difficult. Deciding that we are no longer going to have soda in the house, or that we're not going to eat McDonald's food anymore, those probably don't seem like big feats to someone who grew up living that way. Trying to pry an entire household from the sugary-sweet, boucing-off-the-walls teat of PepsiCo is a challenge akin to moving mountains. Saying we're going to eat more vegetables. We're going to stop eating hormone injected over-medicated grocery store meat. Not only that, we're going to grow more of our own vegetables, and eat them. We're going to plant them, weed them, water them, and harvest them. We're going to blanch, freeze, and can them. We're going to haul buckets and boxes of extra produce to the Farmer's Market to help pay for the costs of growing what we eat. We're going to feed and water chickens and keep the coop clean, picking eggs every day. We're going to chase the escape artist chicken around the yard like idiots twice a week. No only that, we are going to raise up chickens to butcher, process, clean, and freeze. We're going to rake up grass clippings and mulch the garden. We've got to build raised beds and turn a thousand square feet of soil with a shovel. We're going to do all this, and probably a thousand other things we haven't even thought of yet.
Sure, we've done it before, but it's always been a hobby, never a lifestyle. We have always been caught somewhere between the shallow materialistic world of instant gratification and disposable everything, and the idea, the ideal of self-sufficiency. Want one life, and live in the other because we're too lazy to practice what we would preach (if we were the types to preach). We don't really know what we're doing, or where we're going, just that this feels better. So somehow we're going to change the mind of a teenage boy who grew up with a Nintendo controller in his hand, and not a shovel. We're going to raise two little girls into this world, teaching them that this is the right way. How can we be so sure? Maybe in the grand scheme of things, there's no difference between us and the suburban family that obsesses about fancy cars and wouldn't know the first thing about growing a seed. Maybe in the end, it won't matter one bit.
I can say this with absolute conviction. I feel good about this. That's all. In a lifetime of being worried about this or that, and too scared or lazy to change things that I wished I could change, I'm going to take a leap of faith here and trust myself. I feel good about this. So even if I fail, that's not the end of it, it's just a bump in the path.
Yes, it's going to be a lot of work, but I really believe that it's worth it. It's a scary thought, knowing that I'll probably fail at more things than I succeed, but it's worth doing. I know, eventually, I can do it, I can change my life for the better, change the lives of my children for the better. And so can you.
Compost in Training
Oh boy, does winter ever hide messes. It's amazing how many surprises are uncovered by melting snow. Between garbage blown by the wind, the neighbor dog's poop, the remnants of my winter "experiments" and things that were dropped or lost into the snowbanks early in the winter, my yard looks like a minefield of things that the lawnmower would just love to chop up into even finer bits and scatter to the wind.
I guess this means it's time to clean up, before too many people see. I roused my teenage son from his perpetual slumber (and I didn't even need the cattle prod this time!), and set out with great intentions. After standing on the steps, unsure just where to start, I came up with a plan.
Step one in this process was building a new compost pile cage. Last year I just made a pile in an unused corner of the garden. This year, after seeing how nice last year's compost is, I decided I wanted to make a much larger compost pile. This has two advantages for our family. First, compost is an excellent soil conditioner for the garden, and we will have much more free compost to mix into the garden this fall. Second, nearly all of the kitchen scraps, coffee grounds, and paper products from our house can go into the pile and not into the landfill. Most people know that food scraps and lawn clippings will compost, but did you know that most of your junk mail and old newspapers, after removing glossy paper and plastic, can go in the compost pile as well?
We started by driving four steel fence posts into the ground to make a square about 5 feet across both ways. Steel wire mesh left over from building the chicken coop was wrapped around the square, and fastened on one corner so that the mesh can be removed for easier access into the enclosure for stirring and removing compost. The mesh I used is four feet wide, making a four foot tall enclosure, so I left the posts sticking about four feet out of the ground.
After it was built, in went some pumpkins and squash that didn't get used and were starting to rot. Then we added whatever paper, cardboard, small sticks and branches we picked up in the yard, and a garbage can full of used chicken bedding. As the spring cleaning continues, we'll add last year's corn stalks that are still standing, more chicken bedding straw, leaves, kitchen scraps, paper and whatever other natural materials we would otherwise throw in the trash. Later on in the year, lawn clippings that aren't used for garden mulch, any weeds pulled from the garden, damaged garden produce, sawdust made cutting firewood, and many other things will find their way into the pile.
Composting is a simple concept, but there are some things that should be kept in mind. Sooner or later just about any pile will compost, but you can speed this process up significantly in a few ways.
-Aeration is important, the pile needs to get air to keep alive the aerobic (oxygen loving) bacteria that make composting work.
-Add material in layers. Alternate green and brown (wet and dry) material, using about twice as much brown as green material. This prevents too much water in the pile, which will lead to anaerobic bacteria growth and that telltale smell of slough mud/sewage that we want to avoid.
-Damp. A compost pile should never completely dry out, nor should it be so wet that you can squeeze water from the material. If you live in a wet climate, you may need to cover the pile with a tarp to keep excess rain off. If you live in a dry climate, you'll probably have to water it with a hose periodically.
-Turn the pile every few weeks when it's active and generating heat. Just stir it up with a pitchfork or potato fork to mix in that outer material that hasn't composted, and get some air into the middle to provide oxygen for the bacteria.
For more detailed information on composting, I'll post a few links at the bottom.
At the end of the day, this project didn't really clean our yard up much, but it's a necessary task so that we can return those nutrients to the garden soil without adding chemical fertilizers, and so that we can re-use a few things, rather than just dumping them in the landfill. I guess this post is proof that I'm easily distracted, because the yard is still mostly a mess. But hey, I have a nice compost pile started, and I can pick up the trash on a warmer day next weekend. Right?
Links, as promised
http://eartheasy.com/grow_compost.html
http://www.wikihow.com/Compost
Subscribe to:
Comments (Atom)